原文地址:Create a server with deno and mongo
原文作者:Kailas Walldoddi
译者:Tony.Xu

读完这篇文章,你可以掌握:
- 使用
deno_mongo 操作 mongodb 数据库
- 构建
CRUD API 来管理员工信息
- 构建 API 控制器(
Controller)
- 使用简易 deno 框架
abc
- 使用
denv 创建环境变量
准备工作
首先,安装 deno。可以查阅这篇文档,根据当前系统来选择合适的命令行进行安装。
PS: 截止作者(Kailas Walldoddi)写这篇文章时,deno 版本是 1.0.0。
PSS:截止译者(Tony.Xu)写这篇译文和运行样例时,deno 版本是 1.1.1,deno_mongo 版本是 0.8.0,推荐参考掘金上韩亦乐大佬这篇文章进行安装:Deno 钻研之术:(1) Hello,从多样化安装到简单实战。
友情提示:目前 Mac 用户使用 homebrew 安装版本只有 0.4.2,运行本文章代码会报错
本文最后附 Mac 安装 1.1.1 版本 deno 的命令
正式开始
为了实现我们为服务器设计的功能,我们需要一个框架(类似 Node.js 中的 express)。在这里,我们使用 abc 这个简易的 deno 框架来创建 web 应用(除了 abc,你还有很多其他选择,比如:alosaur、espresso、fen、oak…… )
首先,我们在项目根目录下新建 .env 文件,用来声明环境变量。
1
2
|
DB_NAME=deno_demo
DB_HOST_URL=mongodb://localhost:27017
|
接着,构建异常处理中间件来处理控制器中捕获的报错。utils/middleware.ts
 1
 2
 3
 4
 5
 6
 7
 8
 9
10
11
12
13
14
15
16
17
18
19
20
21
|
// utils/middleware.ts

import { MiddlewareFunc } from "https://deno.land/x/abc@v1.0.0-rc2/mod.ts";
export class ErrorHandler extends Error {
  status: number;
  constructor(message: string, status: number) {
    super(message);
    this.status = status;
  }
}
export const ErrorMiddleware: MiddlewareFunc = (next: any) =>
  async (c: any) => {
    try {
      await next(c);
    } catch (err) {
      const error = err as ErrorHandler;
      c.response.status = error.status || 500;
      c.response.body = error.message;
    }
  };
|
然后,编写服务器主程序。server.ts
 1
 2
 3
 4
 5
 6
 7
 8
 9
10
11
12
13
14
15
16
17
18
19
20
21
22
23
24
25
26
27
28
|
// server.ts

// 通过 url 直接引入远程模块。首次运行后,deno 会下载并缓存该模块
import { Application } from "https://deno.land/x/abc@v1.0.0-rc2/mod.ts";
// 使用 denv 来加载 .env 中配置的环境变量
import "https://deno.land/x/denv/mod.ts";
// 余下代码和 `express` 几乎一样,没什么特别的。
import {
  fetchAllEmployees,
  createEmployee,
  fetchOneEmployee,
  updateEmployee,
  deleteEmployee,
} from "./controllers/employees.ts";
import { ErrorMiddleware } from "./utils/middlewares.ts";

const app = new Application();

app.use(ErrorMiddleware);

app.get("/employees", fetchAllEmployees)
  .post("/employees", createEmployee)
  .get("/employees/:id", fetchOneEmployee)
  .put("/employees/:id", updateEmployee)
  .delete("/employees/:id", deleteEmployee)
  .start({ port: 5000 });

console.log(`server listening on http://localhost:5000`);
|
代码第一行,通过 url 直接引入远程模块。首次运行后,deno 会下载并缓存该模块。
代码第二行,使用 denv 来加载 .env 中配置的环境变量。
余下代码和 express 几乎一样,没什么特别的。
接下来我们要为服务器配置 mongodb 连接。幸运的是,已经有现成的 deno 版本的 MongoDB 驱动:deno_mongo。虽然目前 deno_mongo 仍在开发中,并且还未涵盖 mongodb 驱动的全部方法,不过用来做一个小 demo 还是 OK 的。
在 config/ 目录下新建 db.ts 文件
 1
 2
 3
 4
 5
 6
 7
 8
 9
10
11
12
13
14
15
16
17
|
// /config/db.ts
// 注:原文版本 deno_mongo 0.6.0,与 deno 1.1.1 不兼容,需要升级到 0.8.0
import { init, MongoClient } from "https://deno.land/x/mongo@v0.8.0/mod.ts";

// 注:原文创建 db 实例的操作有点复杂…… 以下参照了 deno_mongo 官方文档
// https://github.com/manyuanrong/deno_mongo/tree/master

// db 名称
const dbName = Deno.env.get("DB_NAME") || "deno_demo";
// db url
const dbHostUrl = Deno.env.get("DB_HOST_URL") || "mongodb://localhost:27017";
// 创建连接
const client = new MongoClient();
// 建立连接
client.connectWithUri(dbHostUrl);
const db = client.database(dbName);
export default db;
|
接下来,编写控制器,先从新建员工 createEmployee 开始
 1
 2
 3
 4
 5
 6
 7
 8
 9
10
11
12
13
14
15
16
17
18
19
20
21
22
23
24
25
26
27
28
29
30
31
32
33
34
35
36
37
38
39
40
41
42
43
44
45
46
|
// /controllers/employee.ts

import { HandlerFunc, Context } from "https://deno.land/x/abc@v1.0.0-rc2/mod.ts";
import db from '../config/db.ts';
import { ErrorHandler } from "../utils/middlewares.ts";

const employees = db.collection('employees');

// 定义 schema
interface Employee {
  _id: {
    $oid: string;
  };
  name: string;
  age: number;
  salary: number;
}

/**
 * 新增员工
 * @param c Context
 * @returns $oid 目前 deno_mongo 新增时只返回 _id
 */
export const createEmployee: HandlerFunc = async (c: Context) => {
  try {
    if (c.request.headers.get("content-type") !== "application/json") {
      throw new ErrorHandler("Invalid body", 422);
    }
    const body = await (c.body());
    if (!Object.keys(body).length) {
      throw new ErrorHandler("Request body can not be empty!", 400);
    }
    const { name, salary, age } = body;

    const insertedEmployee = await employees.insertOne({
      name,
      age,
      salary,
    });

    return c.json(insertedEmployee, 201);
  } catch (error) {
    throw new ErrorHandler(error.message, error.status || 500);
  }
};
|
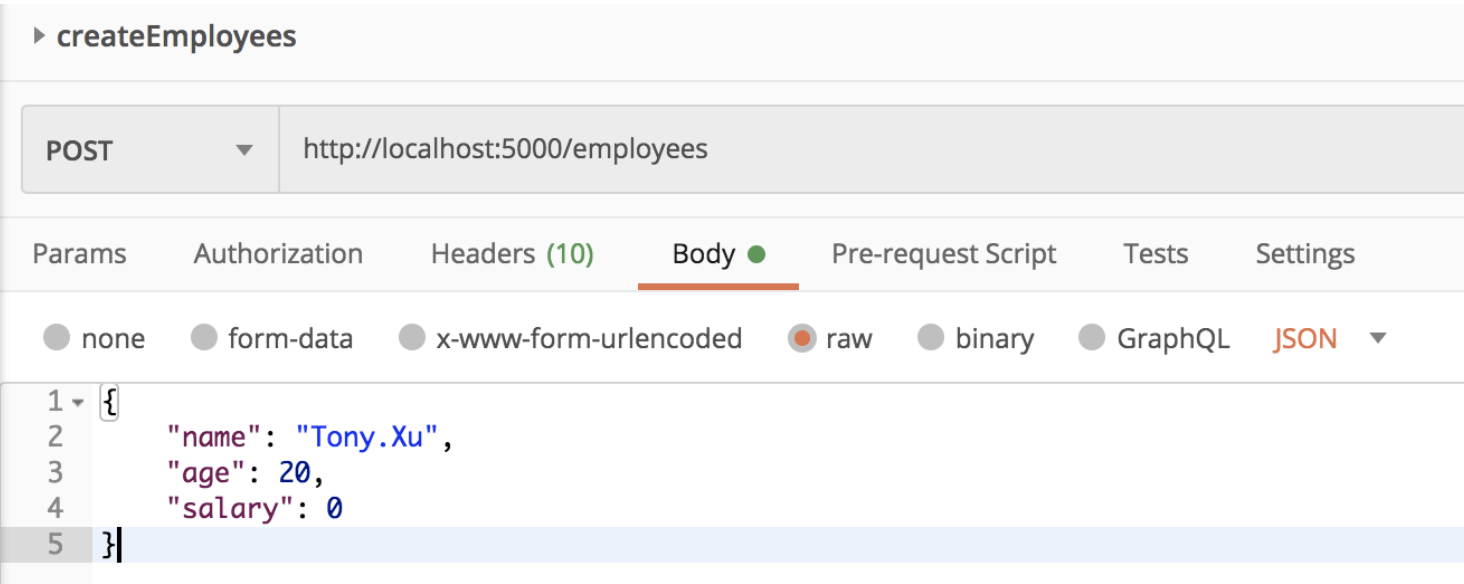
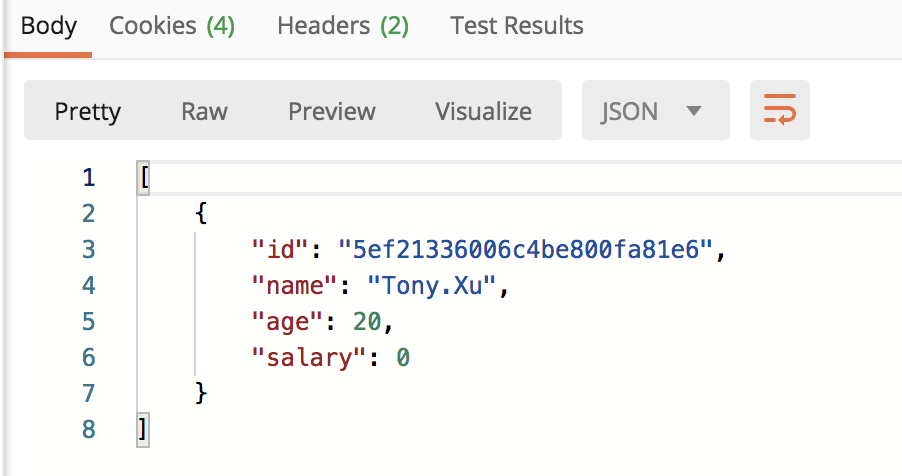
目前 deno_mongo 新增时只返回 _id(希望后续版本会改进这一点)
请求:

返回:

查询全部员工:fetchAllEmployees
 1
 2
 3
 4
 5
 6
 7
 8
 9
10
11
12
13
14
15
16
17
18
19
20
21
22
|
/**
 * 全量查询
 * @param c Context
 * @returns json(Employee[])
 */
export const fetchAllEmployees: HandlerFunc = async (c: Context) => {
  try {
    const fetchedEmployees: Employee[] = await employees.find();

    if (fetchedEmployees) {
      const list = fetchedEmployees.length
        ? fetchedEmployees.map((employee) => {
          const { _id: { $oid }, name, age, salary } = employee;
          return { id: $oid, name, age, salary };
        })
        : [];
      return c.json(list, 200);
    }
  } catch (error) {
    throw new ErrorHandler(error.message, error.status || 500);
  }
};
|
指定 id 查询员工:fetchOneEmployee
 1
 2
 3
 4
 5
 6
 7
 8
 9
10
11
12
13
14
15
16
17
18
19
20
21
|
/**
 * 指定 id 查询
 * @param c Context
 * @returns json(Employee)
 */
export const fetchOneEmployee: HandlerFunc = async (c: Context) => {
  try {
    const { id } = c.params as { id: string };

    const fetchedEmployee = await employees.findOne({ _id: { "$oid": id } });

    if (fetchedEmployee) {
      const { _id: { $oid }, name, age, salary } = fetchedEmployee;
      return c.json({ id: $oid, name, age, salary }, 200);
    }

    throw new ErrorHandler("Employee not found", 404);
  } catch (error) {
    throw new ErrorHandler(error.message, error.status || 500);
  }
};
|
请求:

返回:

更新员工信息: updateEmployee
 1
 2
 3
 4
 5
 6
 7
 8
 9
10
11
12
13
14
15
16
17
18
19
20
21
22
23
24
25
26
27
28
29
30
31
32
33
34
35
36
37
38
39
|
/**
 * 更新员工
 * @param c Context
 * @returns msg string
 */
export const updateEmployee: HandlerFunc = async (c: Context) => {
  try {
    const { id } = c.params as { id: string };
    if (c.request.headers.get("content-type") !== "application/json") {
      throw new ErrorHandler("Invalid body", 422);
    }

    const body = await (c.body()) as {
      name?: string;
      salary: string;
      age?: string;
    };

    if (!Object.keys(body).length) {
      throw new ErrorHandler("Request body can not be empty!", 400);
    }

    const fetchedEmployee = await employees.findOne({ _id: { "$oid": id } });

    if (fetchedEmployee) {
      const { matchedCount } = await employees.updateOne(
        { _id: { "$oid": id } },
        { $set: body },
      );
      if (matchedCount) {
        return c.string("Employee updated successfully!", 204);
      }
      return c.string("Unable to update employee");
    }
    throw new ErrorHandler("Employee not found", 404);
  } catch (error) {
    throw new ErrorHandler(error.message, error.status || 500);
  }
};
|
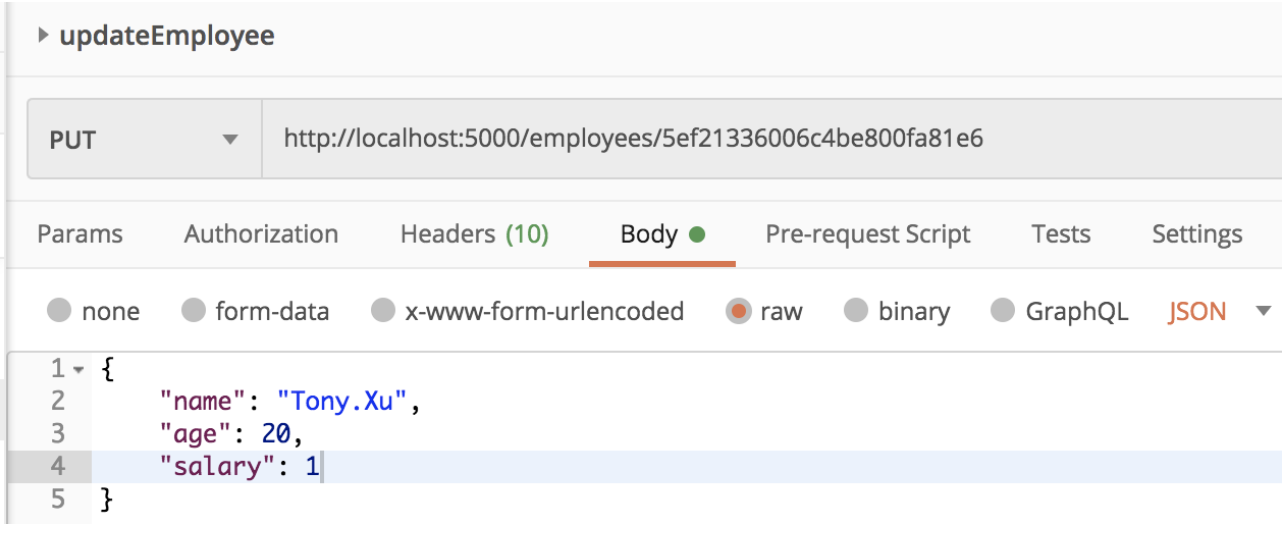
更新成功后回返回对象包含三个字段:
matchedCountmodifiedCountupsertedId
请求:

返回:

最后,删除员工:
 1
 2
 3
 4
 5
 6
 7
 8
 9
10
11
12
13
14
15
16
17
18
19
20
21
22
23
24
|
/**
 * 删除
 * @param c Context
 * @returns msg string
 */
export const deleteEmployee: HandlerFunc = async (c: Context) => {
  try {
    const { id } = c.params as { id: string };

    const fetchedEmployee = await employees.findOne({ _id: { "$oid": id } });

    if (fetchedEmployee) {
      const deleteCount = await employees.deleteOne({ _id: { "$oid": id } });
      if (deleteCount) {
        return c.string("Employee deleted successfully!", 204);
      }
      throw new ErrorHandler("Unable to delete employee", 400);
    }

    throw new ErrorHandler("Employee not found", 404);
  } catch (error) {
    throw new ErrorHandler(error.message, error.status || 500);
  }
};
|
请求:

返回:

代码部分完成了,现在启动服务吧~
1
2
|
deno run --allow-write --allow-read --allow-plugin --allow-net --allow-env --unstable ./server.ts
|
为了确保程序安全执行,deno 默认阻止任何访问磁盘、网络或环境变量的操作。因此,如果想要服务成功运行,你需要加上这些标记:
- –allow-write
- –allow-read
- –allow-plugin
- –allow-net
- –allow-env
可能这个时候你会问了:我咋记得住我要加哪些标记?不用担心,如果缺了哪个的话,控制台会告诉你的。
成功运行,撒花~
1
2
3
|
Compile file:///Users/xxxxxx/deno-demo/server.ts
INFO load deno plugin "deno_mongo" from local "/Users/xxxxxx/deno-demo/.deno_plugins/deno_mongo_8834xxxxxxxxxxxxxx8a4c.dylib"
server listening on http://localhost:5000
|
译注:可以通过 Postman 等其他工具验证一下接口
小结
在这篇文章里,我们实现了:
- 使用
deno 构建 CRUD API 来管理员工信息
- 使用
deno_mongo 操作 mongodb 数据库
- 使用简易
deno 框架 abc 构建服务器
- 使用
denv 声明环境变量
你可能注意到了 deno:
- 不需要初始化
package.json 文件或者在 node_modules 目录下安装模块
- 通过 url 直接引入模块
- 需要Add flags to secure the execution of the program.
- Don’t install typescript locally because it’s compiled in Deno.
以上,
源码
原作者:https://github.com/slim-hmidi/deno-employees-api
译者:https://github.com/xunge0613/deno-demo
译注:XX 学完这个后,这几天又玩了下 Go 语言,发现 deno 好多地方和 Go 很相似,比如:
Go 也通过 url 引入模块(使用版本 1.14.4)deno 使用原生 TypesSript 而 Go 本身就是强类型,必须声明类型;而 Go 里声明 Struct 感觉类似 TS 里的 interface- 可能还有其他的一时想不起来了😝
附录:Mac 安装 Deno
代码截取自Deno 钻研之术:(1) Hello,从多样化安装到简单实战,有修改。
友情提示:目前 Mac 用户使用 homebrew 安装版本只有 0.4.2,运行本文章代码会报错。
推荐:Mac 系统使用 curl 方式安装高版本 deno
 1
 2
 3
 4
 5
 6
 7
 8
 9
10
11
12
13
14
15
16
17
18
19
20
21
22
|
# 通过 curl 下载远程的安装脚本 install.sh 中的 deno.zip 压缩包到本地并立即执行
$ curl -fsSL https://deno.land/x/install/install.sh | sh
# Archive:  /Users/${USER_NAME}/.deno/bin/deno.zip
#   inflating: deno
# Deno was installed successfully to /Users/${USER_NAME}/.deno/bin/deno
# Manually add the directory to your $HOME/.bash_profile (or similar)
#   export DENO_INSTALL="/Users/${USER_NAME}/.deno"
#   export PATH="$DENO_INSTALL/bin:$PATH"
# Run '/Users/${USER_NAME}/.deno/bin/deno --help' to get started

# 输入 deno -V 并不能运行成功 deno 命令,需要我们手动配置环境变量来让终端知道 deno 命令该在哪执行。
$ deno -V
# zsh: command not found: deno

# 注意:${USER_NAME} 是你在自己操作系统下的用户名,需要手动改为自己的用户名。
$ export DENO_INSTALL="/Users/xuxun/.deno"
$ export PATH="$DENO_INSTALL/bin:$PATH"
$ deno -V
deno 1.1.1
$ which deno
/Users/xuxun/.deno/bin/deno
|
友情提示:curl 下载 deno 过程可能有点慢,可以选择扔在一边先不去管它。
结语
ps:上一篇公众号文章,还是2019年6月12日发布的,名副其实的年更公众号了。
注:本文部分翻译自 https://dev.to/slimhmidi/create-a-server-with-deno-and-mongo-206l,为了便于安装文章调试项目,所以在原文基础上有所删减,另外代码部分因 Deno 及相关插件版本原因有所改动~
因为第一次正式接触 deno 和 Go,所以如果有不足之处欢迎指出~
本文排版用了 Markdown Nice,很好用
对了,欢迎点击阅读原文,之后如果文章内容有更新,会在我博客上进行更新~


 清风迅来
清风迅来